


.webp)


Table of contents:
Key takeaways:
- Remote filming lets you record high-quality video without being in the same location, making production faster, cheaper, and more accessible.
- Remote filming is ideal for interviews, testimonials, tutorials, leadership messages, and async recordings.
- Recording software like Riverside simplifies the entire workflow, from capture to editing and export.
- Remote filming scales easily, whether you’re recording one video or hundreds across multiple locations.
Remote filming is a great way to keep production costs low, access guests that are geographically out of reach, and produce content faster. But, you have to know how to do it correctly.
We’ve got your back. In this step-by-step guide, we’ll explain remote filming, how it works, and how to get the most out of your setup.
Let’s get into it.
What is remote filming?
Remote filming is a method of recording video content without being physically present at the location. With traditional filming, everyone in the video is present in the same place. With remote filming, instead, each person records from their own location.
Since all you need is a webcam and mic and there’s no need to travel, remote filming is easier and much cheaper.
It’s especially well suited for:
- Demos and tutorials: Perfect for software walkthroughs, training sessions, and e-learning. Just record from your own space using a webcam or phone.
- Remote interviews: No travel required. Send a link, hit record, and capture polished interviews using tools like Riverside.
- Testimonials: Let customers record on their own time, in their own environment. Asynchronous recording keeps it simple and often leads to more natural, honest responses.
- Leadership and company messages: Share updates with employees or customers anytime, straight from your desktop or phone.
- Mixed-media videos: Blend live recordings with graphics, screen captures, or stock footage for more dynamic storytelling.
Benefits of remote filming
Why film remotely? It isn’t best for every kind of production, but there are clear benefits.
Record from anywhere
Travel is time-consuming and expensive. Remote filming allows you to capture footage from anywhere, with as little as a smartphone.
Lower production costs
Remote filming cuts out some of the big expenses that come with traditional filming, including:
- Travel costs: No need for flights, hotels, or transportation. Participants record from wherever they already are.
- Crew: You can choose to film with the help of a producer, or just run solo. No crew required.
- Location fees: Because you can film from your home, office, or anywhere at all, you won’t need to worry about studio rentals, permits, or insurance.
- Equipment: No need for multiple cameras, lighting, microphones, and mixers and cables. You can film remotely with just a laptop or smartphone.
- Setup: There’s no need for complicated equipment or production steps. Prepare your space and start recording instantly.
- Retakes and reshoots: If you make a mistake, you can re-record instantly, rather than coordinating reshoots and rebooking crew or guests.
Easier scheduling
Remote filming turns scheduling into a non-issue. Send a link, hit record, done. With async recording, guests can record on their own time, eliminating scheduling hassles altogether.
Access to more guests and talent
Removing travel removes friction. Remote filming makes it just as easy to work with someone across the world as someone down the street.
Increased scalability
Remote filming scales easily. You can’t shoot in multiple locations at once, but you can record multiple remote videos in a single day, anywhere in the world.
High quality audio and video
Remote doesn’t mean low quality anymore. With the right recording software like Riverside, you can capture 4K video and 48kHz audio from anywhere.
Faster turnaround times and better collaboration
Because everything is digital, remote recording moves faster. Share files instantly, work in parallel, and invite teammates into a shared Riverside workspace to review, edit, and give feedback.
How to film remotely: A step-by-step guide
Ready to get started with remote filming? Here’s a step-by-step guide on how to do it using Riverside.
Step 1: Prep your setup
Before you get started, take some time to get the basics right. You’ll need the following:
- Camera: A webcam or even a smartphone will work. Check out our list of the best cameras for interviews.
- Microphone: For the best sound, use a dedicated microphone. A USB microphone is simple to use and can vastly improve your audio quality.
- Headphones: Headphones prevent echo in your recording and can help you catch audio quality issues before it’s too late.
- Lighting: At minimum, you should face a window or light source. You can also get a simple ring light or 3-point lighting setup for more flexibility.
- Background: Make sure you have a tidy, attractive background. A virtual background could work as well.
- Remote recording software: Riverside makes it easy to record remotely by providing high-quality audio and video, and lots of tools for polishing your content.
Remember to close extra tabs on your computer and turn off any notifications as well. This minimizes disruptions and can free up system resources for better results.
Step 2: Create a storyboard, shot list, and script
If your project goes beyond a simple interview or testimonial, a storyboard or shot list is worth the effort. This is a scene-by-scene plan that maps out key moments, dialogue, pacing, and visual details (like camera angles and movement).
Even for straightforward interviews, a visual plan helps everyone align on the look and feel. It also makes the shoot easier to organize.
Step 3: Prep any guests
While remote filming involves less preparation, you’ll still need to ensure your guests look and perform their best. Make sure they (like you) have a microphone, headphones, and a decent webcam. You can also provide them with a list of tips on how to set up an appropriate recording environment and frame their shot.
Remember to invite them to your Riverside Studio early to troubleshoot any issues.
Step 4: Set up your recording studio
Log into Riverside. If you don’t have an account, you can create one and record for free.
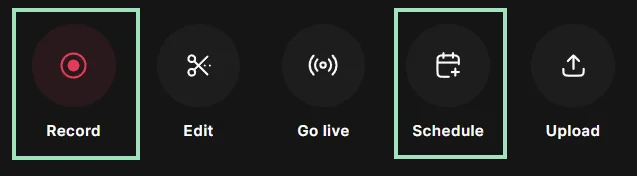
Click “Record” to immediately enter a recording studio, or “Schedule” to plan a future recording with a guest.
If you opt to plan your session, you can set up the session and invite your guests, then find your session under “Projects” and click “Start Session.”

Click “Join Studio.”

Step 5: Adjust settings
Once you’re in your recording studio, you can adjust settings like:
- Layout: Choose between full screen, side-by-side, picture-in-picture, and other layout options for the right look.
- Script: Enter a script and so you can read it from the teleprompter while you’re recording.
- Text: Use it to add lower thirds for you and/or your participants.
- Brand: Add a logo and branded background.
- Recording settings: Decide what resolution to record in, and whether to turn on background noise removal and echo cancellation.
Step 6: Invite your guest or customer
Use the link provided to invite your guest to the studio. You can also set up your studio in advance and provide this anytime.

Step 7: Conduct a quick pre-recording check
Once your guest is in the studio, do a quick pre-recording check. Confirm that:
- Each participant has the right mic and camera selected.
- Each participant’s framing is appropriate.
- Each participant’s audio is clear.
This is also a good time to align on who’s doing what, what you should and shouldn’t do, and whether you can pause for retakes.
Step 8: Start the recording
When everyone is ready, hit “Record.” After a 5-second countdown, the recording will begin.
If you make a mistake, you can pause and re-record. You can also edit out any bloopers later.
During your recording, you can share your screen or a presentation by clicking “Share,” or play audio or video files from the “Media” menu.

Step 9: Finish the recording
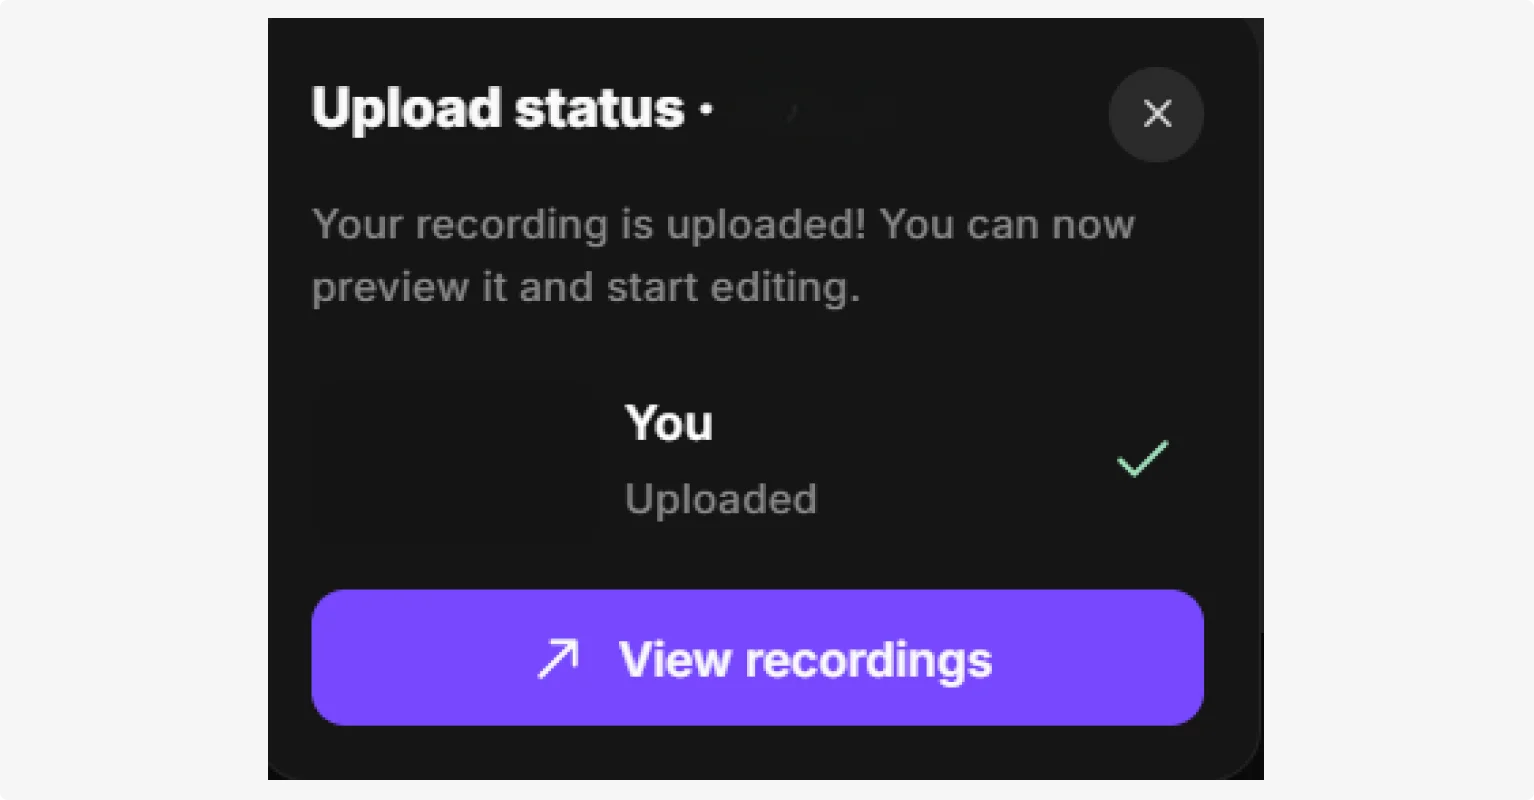
When you’re finished recording, click “Stop.” It may take a few minutes for Riverside to process your video. You will then get a link to view your recording.
Step 10: Edit your work
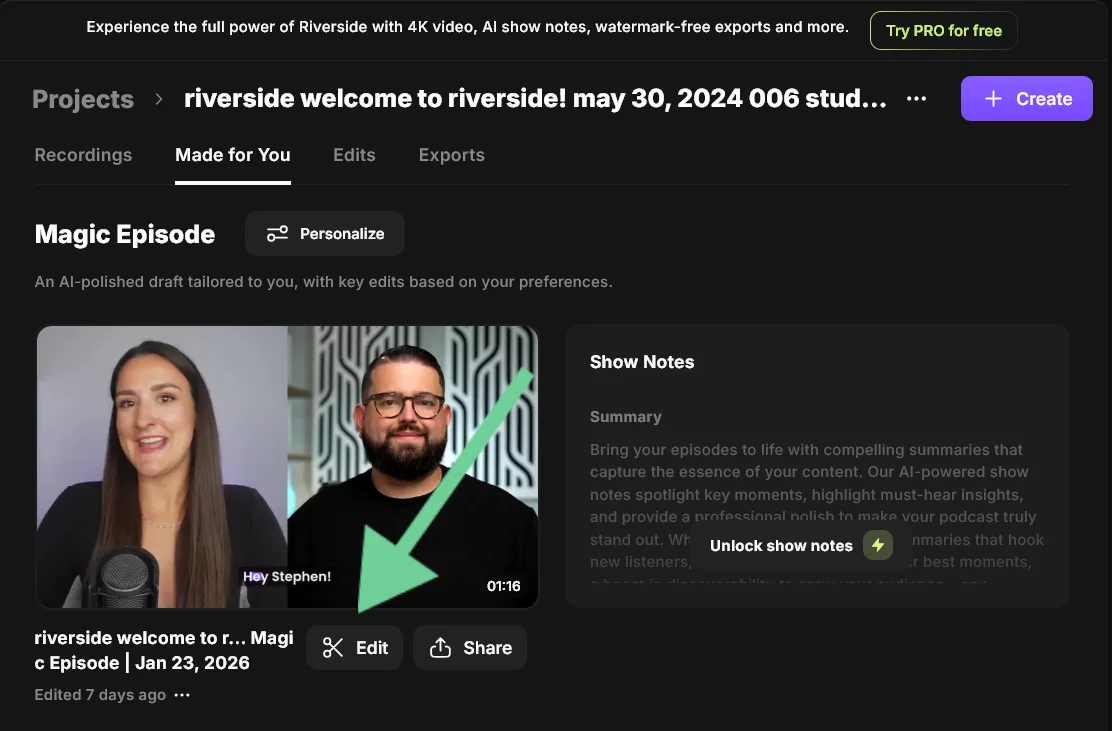
Because Riverside is a video recorder and editor, you can edit your work directly from the platform. Just click “Edit” to open your video in the editor. From there, you can:
- Trim your video using text-based editing.
- Change up layouts and designs.
- Enhance audio and remove background noise with a click using Magic Audio.
- Clean up long pauses and filler words.
- Add captions, overlays, and branding.
- Edit via simple prompts using the AI Co-Creator.
- Set your video’s aspect ratio for use on different platforms.
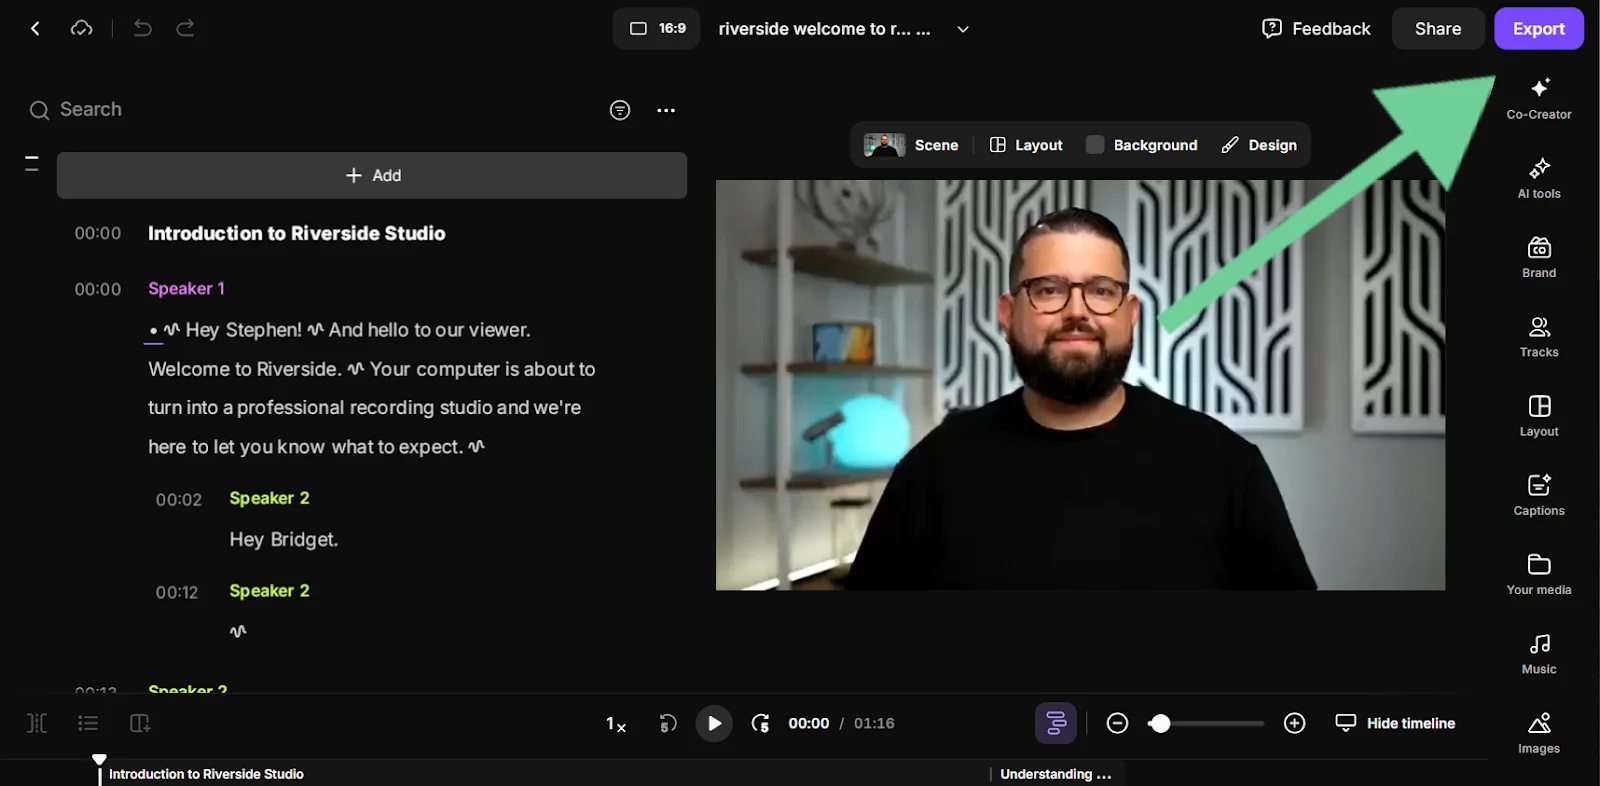
Step 11: Export your video
When you’re done editing, hit “Export” to export your work. Riverside allows you to export your audio and video, audio-only, as well as your full transcript.
You can also check this video to find some useful tips to record a remote interview in top quality:
Tips for high-quality remote filming
Remote or not, quality still matters. Here’s how to get clean, professional results.
Prioritize high-quality audio
Audio quality is non-negotiable. A quiet room, a microphone, and headphones get you most of the way there. If your space isn’t perfect, tools like Riverside’s Magic Audio can clean up background noise and give your recording a studio-quality finish.
Control your lighting
Lighting can make or break your video. Aim for even, front-facing light on you and your guests. A window or a simple light setup is often all you need. Read our guide on video lighting for more tips.
Choose the right camera framing
Good framing instantly makes your video feel more professional. Position the camera at eye level, frame yourself from the chest or shoulders up, and leave a little space above your head. Make sure your background is clean and uncluttered so the focus stays on you, not what’s behind you.
Use a stable internet connection
A weak connection can ruin an otherwise great recording. Use a reliable, high-speed internet connection, and connect via Ethernet whenever possible. Software like Riverside records locally, so even if your internet connection is slow, the quality of your recording won’t be affected.
Prep your guests
A little prep goes a long way. Share simple instructions ahead of time, such as:
- Where to record.
- What to wear.
- How to position the camera and mic.
This helps guests feel confident and ensures more consistent, professional-looking footage.
Consider a multicamera setup
A multicamera setup adds visual variety and makes videos more engaging. With Riverside, you can connect multiple cameras (e.g., a webcam plus a smartphone) and switch between angles in post-production. This gives you more flexibility without adding complexity to the shoot.
Conduct a quick test recording
Do a short test to check audio levels, lighting, framing, and camera selection. Fixing small issues upfront saves time and can help avoid reshoots later.
FAQs about filming remotely
How do I record a video remotely?
You can record a video remotely by using remote video recording software that captures each participant’s audio and video locally.
There are two main options:
- Live remote recording: Record in real time with everyone present.
- Asynchronous recording: Participants record separately on their own schedule.
With Riverside, you can invite guests with a simple link and record studio-quality audio and video locally even with unstable internet. Record from a quiet, well-lit space, position your camera at eye level, and use a microphone if possible. After recording, you can edit, enhance, and export your final video, all in the same platform.
What is the 20-30 rule in film?
The 20-30 rule is an editing and pacing guideline that suggests you should change something on-screen every 20-30 seconds to keep viewers engaged. This could mean cutting to a different camera angle, using B-roll or screen shares, or making some other noticeable shift in action or framing.
With Riverside, each participant is recorded on a separate track, which makes it easy to switch visuals every 20-30 seconds without awkward jumps. You could also use a multicamera setup to switch angles or chat with Co-Creator to add B-roll video just by chatting with it.
What is remote production?
Remote production is the process of creating audio or video content with people, equipment, and production work happening in different locations. Rather than working together in person, everyone involved is connected and collaborates over the internet.
While remote filming refers to recording remotely, remote production covers the whole workflow, which includes recording, editing, and collaboration. Even directing can happen remotely!
What are the negatives of remote production?
Remote production’ main drawbacks include overreliance on internet speed, less control over your guests’ recording, and lack of spontaneity. Here’s a breakdown:
- Less control over environments: You can give guests tips about lighting, background noise, and other potential issues, but it’s up to them to implement your advice (or not).
- Reliance on internet quality: A poor internet connection can cause lag, dropped calls, or affect pacing and performance. Fortunately, Riverside records locally, which completely negates this risk.
- Less spontaneity: Remote production can feel more structured. This can mean fewer natural cues and less on-set chemistry and energy.


.webp)
.webp)
.webp)


