


Table of contents:
Key takeaways:
- There are multiple ways to transcribe audio to text, including AI tools, manual transcription, and built-in app features.
- AI-powered transcription is the fastest and most scalable option, but accuracy depends on audio quality and the tool you choose.
- Manual transcription is the most accurate option, but it’s also the most time-consuming and expensive.
- Speaker labeling, timestamps, and text-based editing can save significant cleanup time.
Need a transcript of a call, meeting, webinar, or podcast?
It’s easier than ever, thanks to a range of great tools. Whether you're transcribing in real time or uploading a recording afterward, we'll walk you through how to turn audio into text and highlight the best options out there.
Let’s dive in!
How to transcribe audio to text: 5 Key ways
How you transcribe audio to text depends on the tool you decide to use. Here are your primary options:
Video recording tools with transcription
Some video recording tools, like Riverside, transcribe as you record. They are a simple and convenient way to get the job done accurately, quickly, and with minimal fuss.
You can usually upload and transcribe a previous recording, too. Tools like Riverside are best for podcasters and creators, remote interviewers, and social content creators. They’re also great for a quick meeting.
Pros:
- Record and transcribe at the same time, or upload an audio file.
- Often includes speaker differentiation, punctuation, and formatting.
- May include additional audio and video editing tools.
- Generally very accurate.
- Free and affordable tools available.
Cons:
- May not meet legal or compliance standards for sensitive content.
Manual transcription
Manual transcription means a person listens to the audio and types out the transcript, whether that’s you or a hired professional. This option is typically very accurate and may be necessary when dealing with sensitive or private data. However, it is time-consuming and costly compared to automated options.
Pros:
- Highly accurate, even when background noise and accents are a factor.
- Can transcribe live or from a recording.
Cons:
- Expensive.
- Time-consuming (if you do it yourself).
Speech-to-text software
Speech-to-text software (e.g., Google Docs voice typing, Google Live Transcribe) is designed for real-time transcription, and often focuses on dictation. These tools tend to work best for single-person dictation because they often lack speaker differentiation, formatting, and even punctuation.
Pros:
- Simple and easy to use.
- Many free options available.
Cons:
- No speaker identification.
- May not record audio.
- Generally less accurate than other methods.
- Typically only transcribes in real-time (no audio uploads).
Meeting and app-based live transcription
Tools like Zoom, Teams, Notion, and Google Meet include transcription features. But because they aren’t dedicated transcription tools, the quality of their output can vary. They’re a convenient option for meetings, webinars, and team collaboration.
Pros:
- Handy when you’re already using these apps.
- Transcribes in real time.
Cons:
- Limited language support.
- Transcription quality can vary.
- Generally limited speaker differentiation, if available at all.
LLM tools
LLMs, like ChatGPT and Gemini, can transcribe audio to text. You can even ask them to produce time-stamped transcripts. However, these tools can be ‘hit or miss’ and the free versions only transcribe very short audio files (usually less than 10 minutes).
Pros:
- Simple and accessible transcription via text prompts.
- Relatively accurate and capable of delivering different formats.
- Multi-language support.
Cons:
- Quality can be inconsistent.
- Limits on file size/recording length, especially on free plans.
How to transcribe audio automatically online
Ready to start transcribing the easy way? AI-powered, automatic transcription using online tools is your best bet. With Riverside, you can record and transcribe podcasts, webinars, video calls, and more quickly and easily. Here’s how:
Step 1: Sign up or log in to Riverside.
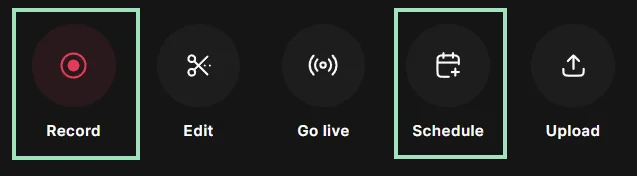
Step 2: Start recording immediately by clicking “Record.” You can also opt to plan your recording for later by clicking “Schedule.”
Step 3: Select your mic and camera, and whether you are using headphones. Then click “Join Studio.”

Step 4: Invite other participants to join your studio by sending them a link or inviting them by email. (Note that you can also do this in advance of your scheduled call).

Step 5: When everyone has entered the studio, click the red “Record” button. After a short countdown, the recording will begin.

Step 6: Conduct your event as usual. Riverside will record your audio (and, if you like, video), and transcribe as you speak.
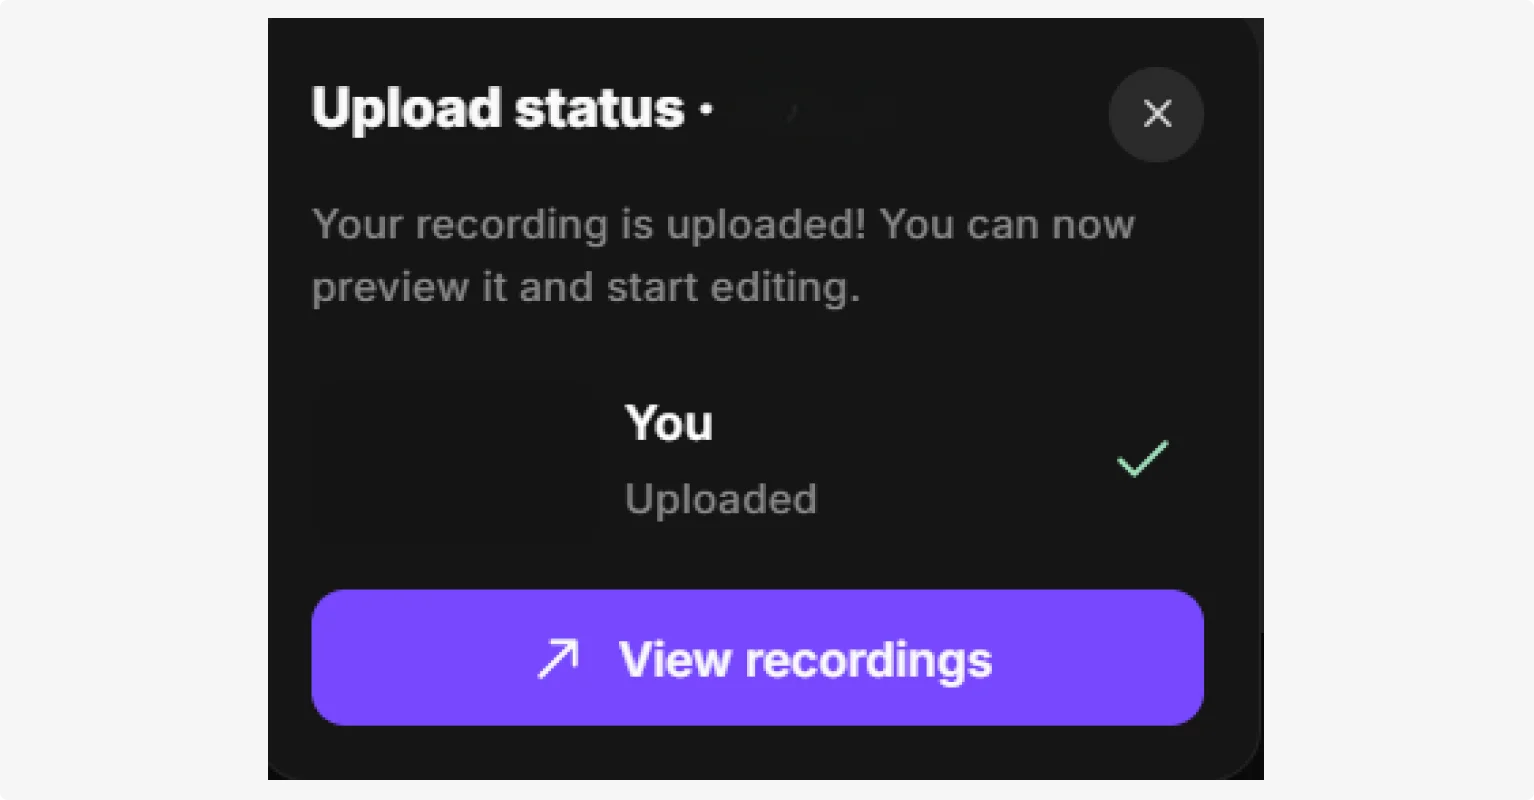
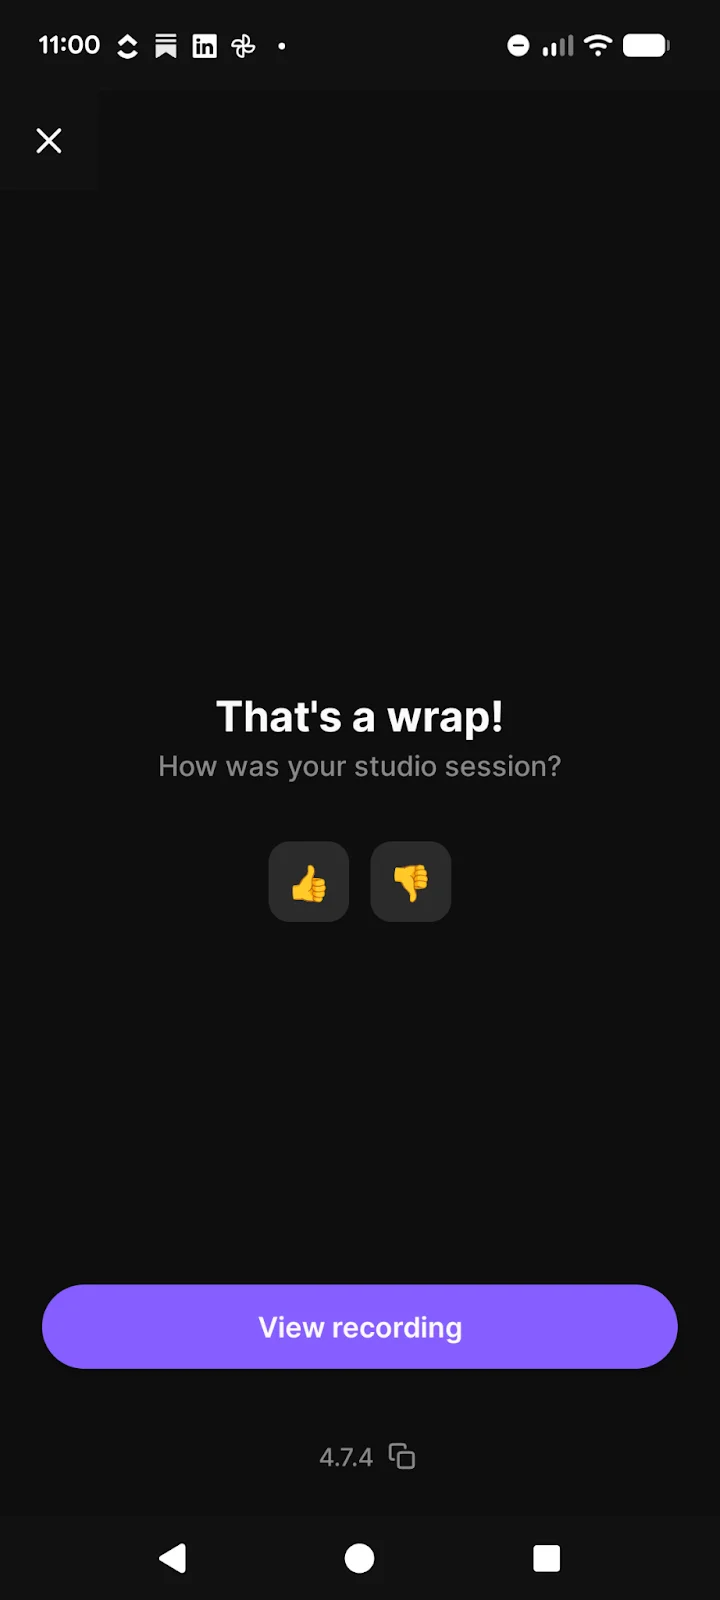
Step 7: Click “Stop” to end the recording when you’re done. Click “View recordings.”
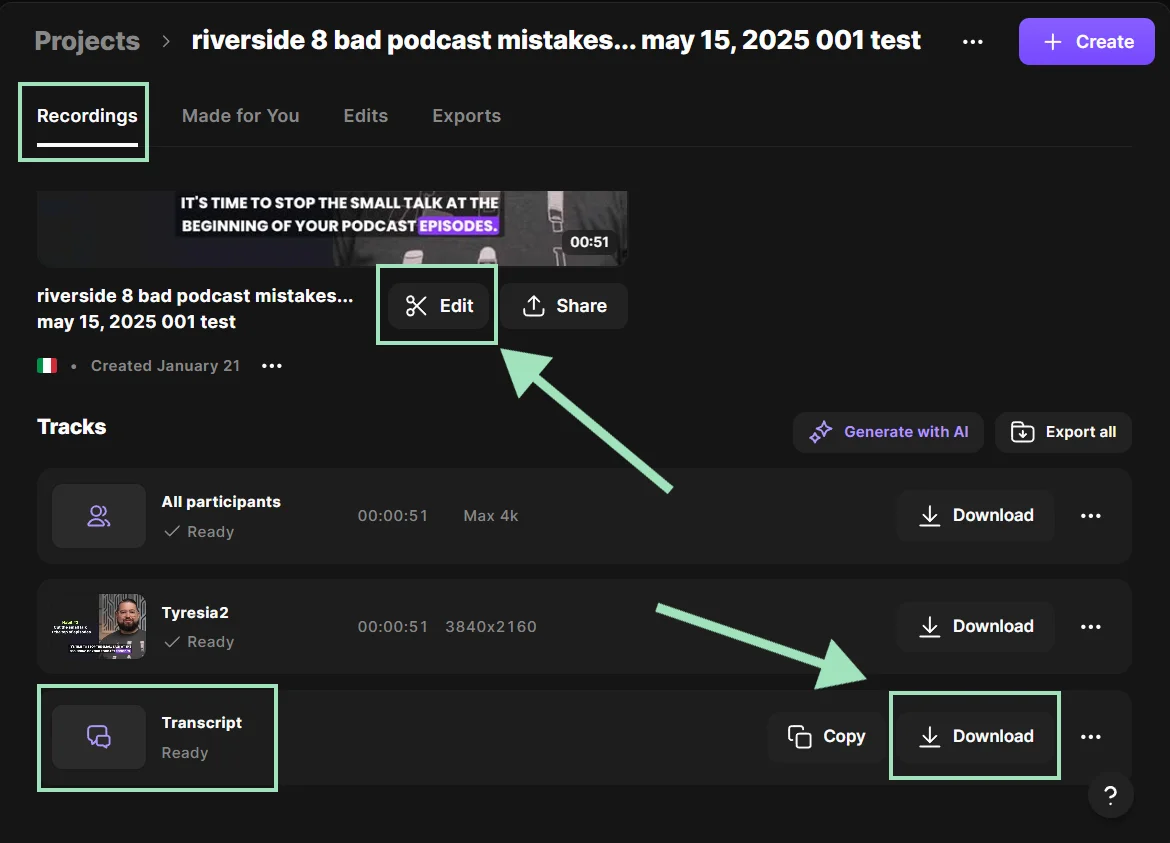
Step 8: Now you have two options. Now you have two options. From your “Projects” page you can:
- Click “Edit” to go to the Editor and use your transcript to edit your content using text-based editing.
- Scroll down under “Tracks”, find “Transcript” and click “Download” to download your transcript as a TXT or SRT file.
And that’s it! Riverside’s automatic transcription is as easy as any video call. The only difference is, you get professional quality audio and video and a downloadable transcript that’s 99% accurate and includes speaker differentiation.
You’ll also get access to Riverside’s suite of editing tools, so you can edit your audio to a more professional standard.
How to transcribe audio to text on your phone
If you’re on the go, you may want to transcribe audio to text on your phone. There are a few apps you can use to do this, including Google transcription tools, like Google Live Transcribe. However, many apps are pretty rudimentary and don’t include features like speaker differentiation and downloadable transcripts.
Riverside’s free mobile app allows you to record and transcribe content from anywhere. Here’s how to use it:
Step 1: Open the Riverside app on your mobile device and log in.
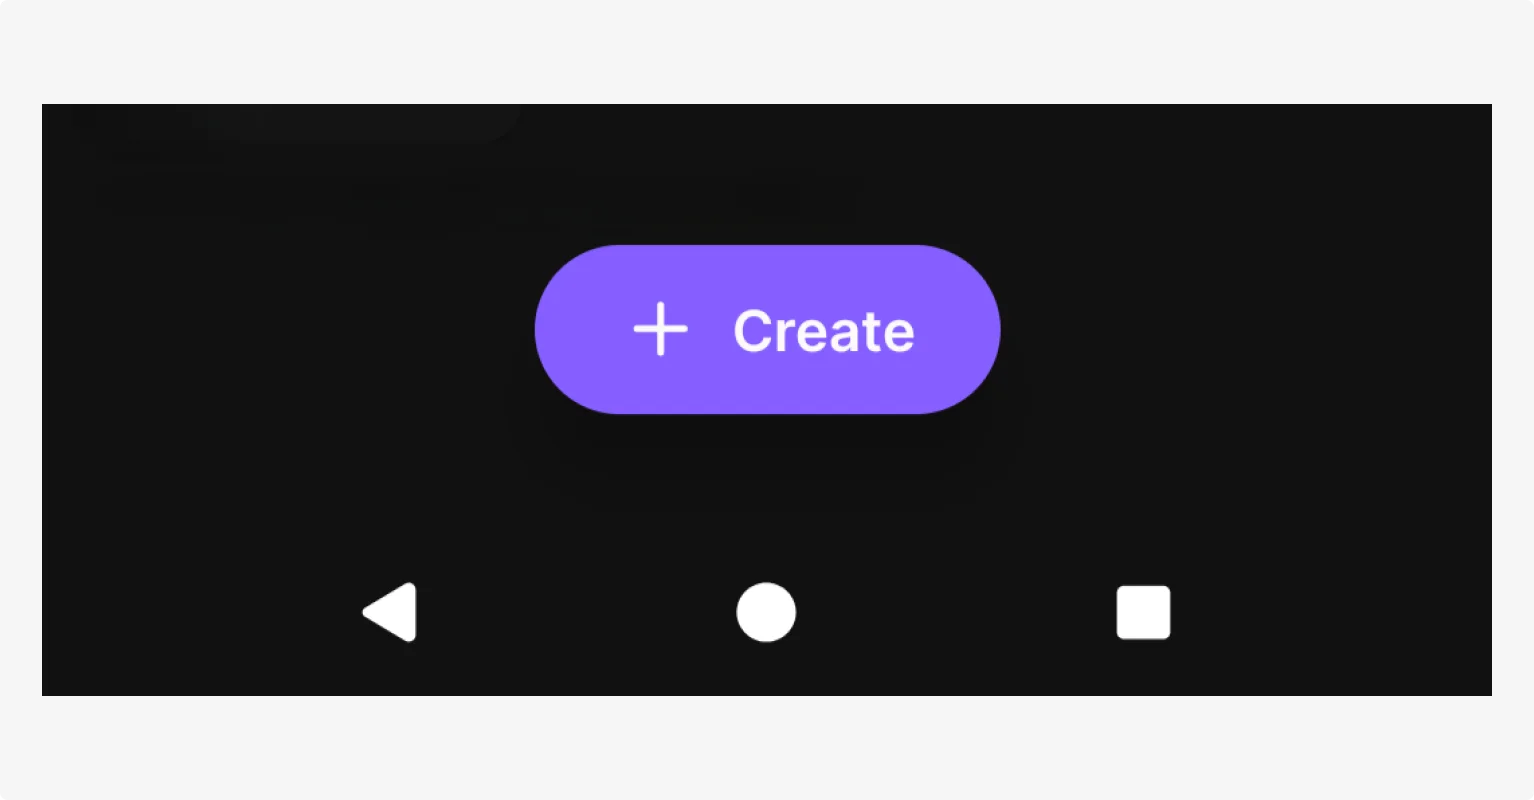
Step 2: Tap “Create” to start a new studio.
Step 3: Tap “Record” to enter your studio. Here you can invite guests, select a “Solo” recording, or choose to record “Audio” only.

Step 5: Tap the red button to start your recording.

Step 5: Tap the red button again to stop the recording. If you’re done, tap “Leave” in the top left corner of your screen. You’ll get a prompt to view your recording. Click “View recording,” then click the recording to edit it.
Step 6: Now you can opt to edit your recording using text-based editing. You’ll be able to see your transcript below the video.

Step 7: To download your transcript, visit Riverside in your browser. Find your new recording under “Projects,” then click on it to download an SRT or TXT file.
How to transcribe audio to text manually
Transcribing text manually can be really accurate, even when there is overlapping speech, strong accents, or background noise. It’s also required in some industries due to privacy or other regulations. But it’s time consuming. And, if you pay someone else to do it, it’s also expensive.
Here’s what the process looks like:
Step 1: Listen to the recording all the way through to get a sense of the different speakers, content, and context of the conversation.
Step 2: Start the recording again to begin transcribing what you hear. Pause or rewind as often as necessary to keep up with what is being said. You can also opt to add time stamps at regular intervals or before key sections.
Step 3: Once you’ve transcribed the entire text, go through and listen again. Follow along in your transcript to make sure it accurately reflects the spoken audio.
Step 4: Edit your transcript to clean up grammar and punctuation. Depending on your transcription style, you might also remove filler words and pauses, or adjust wording for clarity. Some transcripts require 100% accuracy to what was said and how it was said.
If you opt to hire someone to transcribe your audio to text, it will likely cost you between $1 and $10 per audio minute. Pricing depends on the experience of your transcriber, the type of transcript you require, and whether it needs to be certified for legal or official purposes.
The benefits of transcribing your content
Transcribing is easy (with Riverside), but if you’re still wondering whether you should, here are some of the key benefits:
Accessibility
Transcription is a great way to make spoken audio accessible to more people. You can use your transcript to create captions and subtitles, so people who are hard of hearing or watch on mute can still enjoy your content.
SEO
If you’re creating podcasts or YouTube content, a transcript can help boost your podcast SEO and discoverability, making it more visible in search engines. Audio content is inaccessible to search engines, so they rely on transcripts, hashtags, and other text to understand your recording.
Content repurposing
A transcript can make it easier to repurpose your recording into other types of content, such as blog posts. Riverside’s AI Co-Creator can even produce a blog post for you based on your transcript just by chatting with it.
Text-based editing
Automated transcription tools like Riverside often provide text-based editing. This allows you to easily edit your audio and video by cutting words from the transcript.
Recordkeeping
If you’re recording meetings, interviews, or internal documentation, a transcript can provide a searchable way to maintain records.
3 Simple tools that transcribe audio to text for free
If you’re looking for a free transcription tool, there are quite a few to choose from. Here are some great options to consider:
- Riverside’s free transcription tool: Just want a quick transcript without other tools? Drop in your audio file, click “Transcribe,” and you’ll be able to download a TXT or SRT file within minutes.
- Google transcription tools: Google has lots of free transcription tools you can use for calls, conversations, dictation, and interviews.
- YouTube: If you upload a video to YouTube, you can use YouTube Studio to auto-transcribe your content and download the transcript.
For more options, check out our list of free transcription software.
6 Tips for choosing the right transcription tool for your needs
Not sure which transcription tools to use? Here are 6 simple tips to help you find the right fit.
Start with your use case
Before comparing features, take the time to understand who you are and what you’re transcribing. Different users need very different tools.
- Podcasters, YouTubers, and content creators should look for recording-first platforms that handle long, conversational audio. The tool should also support multiple speakers and provide features for editing, captions, and repurposing.
- Teams and businesses that need to transcribe meetings benefit from tools that integrate with (or replace) meeting apps. Your tool should offer speaker labeling, summaries, and collaboration features.
- Journalists and researchers need accurate transcripts with timestamps and searchability for quotes. Riverside, for example, includes a search tool for easily navigating transcripts.
- Developers and technical teams may prefer raw transcription APIs they can plug into custom workflows.
- Legal, medical, or compliance-heavy users should prioritize tools with higher accuracy guarantees, audit trails, and data handling controls.
- For short clips or voicemails, a lightweight transcription app may be all you need.
Assess accuracy
Accuracy varies across transcription tools. If precision matters, test the tool with samples of your audio before committing.
Decide whether you need speaker labeling
Many transcription tools do not provide speaker labeling. If you plan to edit interviews, attribute quotes, or enable your viewers to follow the conversation easily, strong speaker labeling can save you a lot of time.
Consider how you’ll use the transcript
Will you use the transcript for captions, editing audio or video, show notes, summaries, or search? The closer the transcript is to your end goal, the less work you’ll do later.
Some tools offer text-based editing, caption exports, or highlight features, while others only give you raw text.
Ensure language and accent support
Not all transcription tools handle languages and accents equally well. If you work with international speakers, bilingual content, or strong regional accents, make sure the tool supports them reliably. Riverside can transcribe in 100+ languages with up to 99% accuracy.
Evaluate editing and cleanup features
No AI transcript is perfect. Built-in editing tools like searchable transcripts or text-based audio editing can dramatically reduce post-production time. If you expect to use transcripts as part of an editing workflow, these features can matter more than raw transcription accuracy alone.
FAQs about transcribing audio to text
How accurate are AI transcription tools?
AI transcription tool accuracy varies depending on audio quality, background noise, whether speakers have strong accents, the type of vocabulary used, etc. Plus, some AI transcription tools are significantly better than others.
AI powered tools in general tend to have around 95% accuracy, but many do not provide speaker differentiation and timestamps. Riverside’s AI-powered transcription is up to 99% accurate and provides full punctuation, timestamps, and speaker differentiation.
How can I improve transcription accuracy?
The best thing you can do to improve transcription accuracy is to record higher quality audio. To do so, record in a quiet space and use an external microphone, headphones, and dedicated recording software like Riverside. It records crisp audio in up to 48 kHz, which makes accurate transcription far more likely.
Can ChatGPT transcribe audio files?
ChatGPT supports audio transcription depending on the app and plan you’re using. You can transcribe audio using the ChatGPT mobile apps or through higher-level ChatGPT plans that support audio upload and recording (e.g., Plus, Enterprise). You can also transcribe through the OpenAI Whisper API, but this requires developer skills.
How does audio to text transcription work?
Audio-to-text transcription works by turning sound waves into text using machine learning. Here’s a simple overview of the process:
- First, the audio is recorded or uploaded to an AI system. The system may clean it by normalizing volume or reducing background noise.
- The audio waveform is converted into a spectrogram, which is a visual representation of sound over time and frequency.
- A neural network trained on thousands of hours of speech analyzes the spectrogram and predicts which sounds correspond to letters and words. Context is used to determine what’s most likely being said.
- Next, a language model improves the output by applying grammar, spelling, and probability. For example, “there” can be chosen over “their” based on surrounding words.
- Depending on the tool, the system may also label speakers, add timestamps, or account for custom vocabulary, like names or industry-specific terms.
- Finally, the completed transcript is delivered as text, ready for editing, captions, or search.
Which AI can transcribe an audio file?
There are many AI tools and services that can transcribe audio files. These range from simple, app-based options to powerful developer APIs. They vary in accuracy, features, and cost. These tools fall into the following categories:
- AI-powered recording and transcription tools: Tools like Riverside or Otter.ai allow you to record audio and transcribe content automatically.
- AI-powered transcription tools: Tools like Trint and Rev don’t record audio, but you can upload files and get AI transcripts.
- Developer/API platforms: This includes tools like OpenAI’s Whisper API and Google Cloud Speech-to-Text. Developers use these to build transcriptions into an app or workflow.
- App and built-in transcription: Most phones have built-in apps you can use to transcribe audio, such as the Google Recorder app or Apple Voice Memos.
What are the limitations of using Google for transcription?
Google’s transcription tools’ limitations include low accuracy, lack of advanced features, and privacy concerns. Here’s a breakdown:
- Accuracy issues: Many Google tools perform very well with very clear, single-speaker audio. But, they tend to struggle with overlapping speakers, background noise, or strong accents.
- Limited speaker labeling: Google Speech-to-Text supports speaker labeling, but it requires configuration. Most other Google tools do not label speakers. (But Riverside does!)
- Not creator friendly: Google’s tools can transcribe text, but not much else. Even if you get a clean transcript, you’ll need other tools to finish the job.
- Privacy and data concerns: Because transcriptions run on Google’s cloud, transcribing sensitive or regulated content may be an issue.


