


Table of contents:
Key takeaways:
- Google offers several free transcription tools, including Gemini, Speech-to-Text, Google Docs voice typing, Keep, Live Transcribe, and its Recorder app.
- The simplest option for short transcriptions is Google Gemini, while the Speech-to-Text API is better for full recordings.
- If you have a Google Workspace plan, then Google Meet’s transcription tool is included.
- For on-the-go voice-to-text, try Google Keep or Google Live Transcribe.
- If you're looking for a high-accuracy alternative for quick and easy transcriptions for recorded or live video, try Riverside.
Looking to transcribe virtual meetings, webinars, videos, or just turn audio notes to text? Google makes it easy with its transcription tools.
Here we’ll take a look at 7 of the most useful Google transcription tools, how to use them, and which one might be the right one for your project.
Let’s do this!
Google transcription: 7 tools to try
Google offers a number of handy transcription tools. Here’s a quick breakdown:
How to transcribe using Google Gemini
Price: Free for up to 10 minutes of audio (per file). $19.99 per month for up to 3-hour recordings (per file).
Best for: Short and simple transcription projects (e.g., dictation, narration).
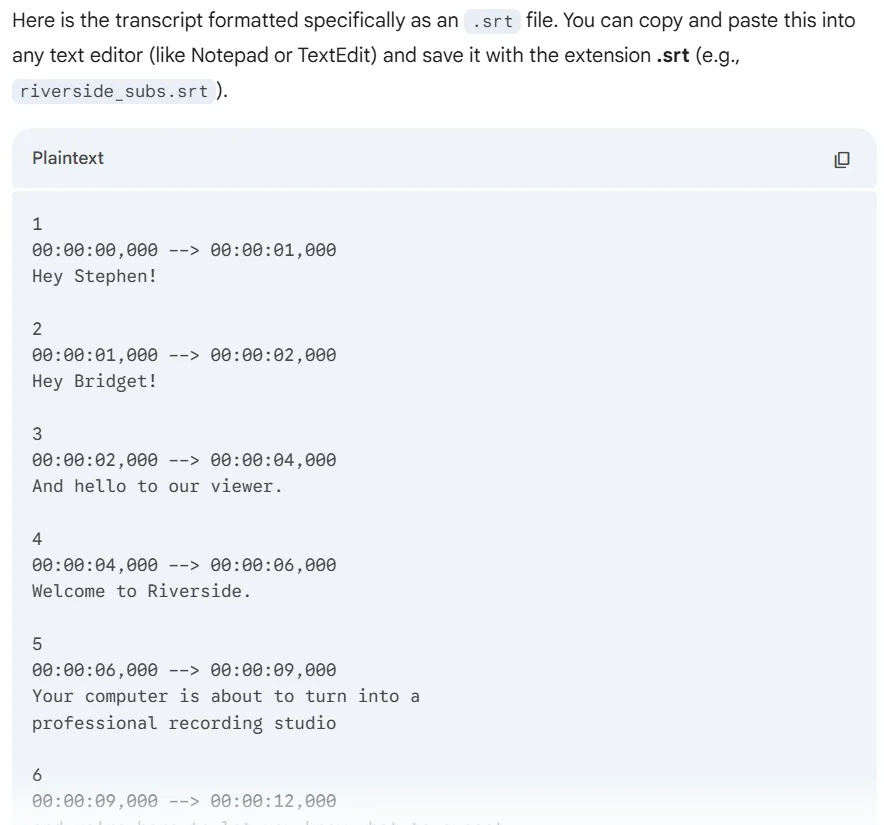
Google Gemini can transcribe your audio and video files in a prompt. You can even ask it to provide accurate time stamps that you can save as an SRT file.
I found the results on the free plan pretty accurate, but the paid plan uses even better LLM models and may produce even better transcriptions. Plus, since it’s prompt-based, you can easily chat with Gemini to adjust your transcript until it’s just right.
Here’s how to use Google Gemini to create a transcript.
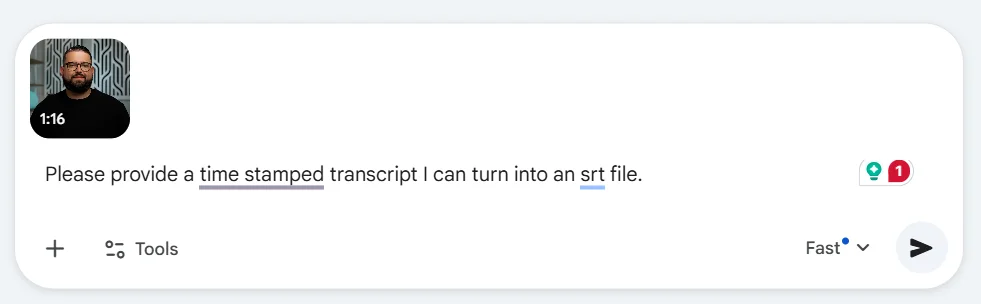
Step 1: Open Google Gemini and click the “+” to upload an audio or video file from your computer.

Step 2: Provide a detailed prompt to Gemini explaining what you want. For example, you could say, “Please provide a time-stamped transcript I can turn into an SRT file.”
Step 3: Review your transcript and prompt Gemini to make changes as needed. When you’re happy with the results, you can copy and paste them into a text editor to save as an SRT file.
Pros
- Free and very easy to use: Just upload, prompt, and Gemini will do the rest.
- Remarkably accurate: Transcripts are very clean, and Gemini is better at dealing with jargon and interpreting context than most other tools.
- Iterative: You can chat with Gemini (prompts) to get your transcript just right.
- Supports multiple languages: Quickly transcribe and translate your work into 100+ languages.
Cons
- Limited free plan: Only offers 10 minutes of audio per file.
- Glitchy: I often ran into issues getting Gemini to accept uploaded content.
How to transcribe with Google Meet
Price: Included in Google Workspace Plans starting at $14/month.
Best for: Recording virtual meetings.
Google Meet offers transcription, but only on paid Google Workspace plans. If your team is already using Google Workspace, this could be a cost-effective option. Plus, because Google Meet now uses Gemini, it can provide summaries, action items, and other helpful add-ons based on your meetings.
Here’s how to use Google Meet transcription to transcribe your next meeting:
Step1: Open Google Meet on your computer or laptop (transcription isn’t available on mobile). Join or initiate your meeting.
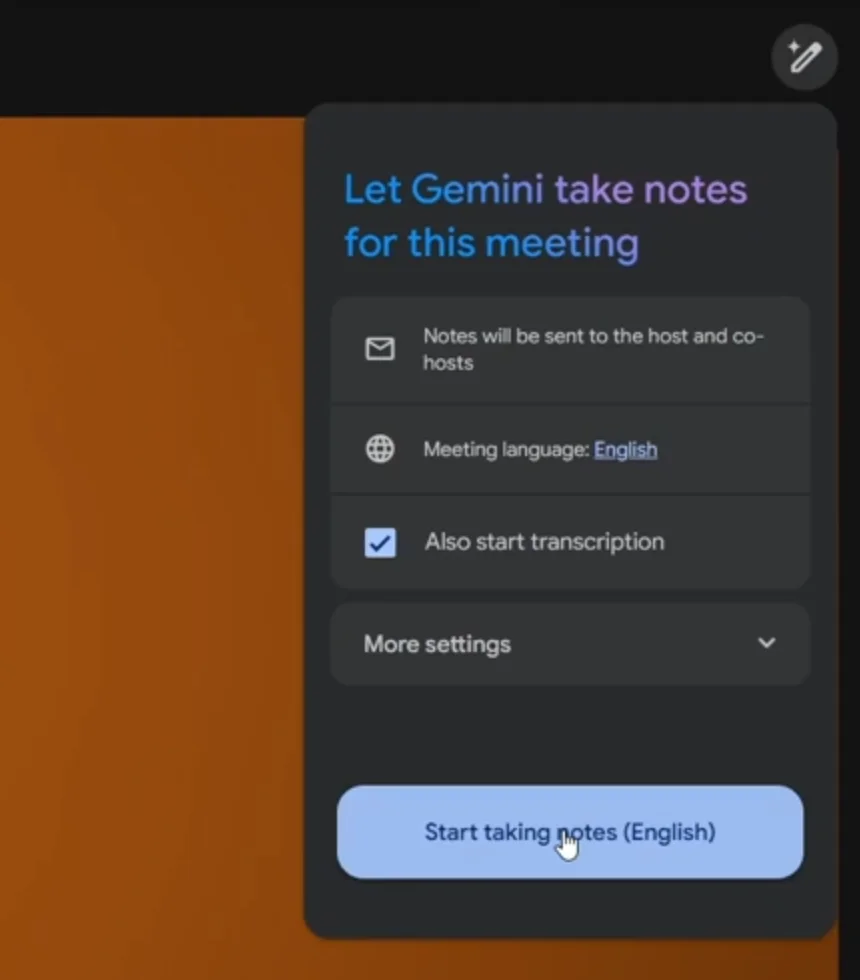
Step 2: Click on the pencil icon in the top right-corner of Google Meet. Ensure that the correct meeting language is set, select “Also start transcription,” then click “Start taking notes.”
Step 3: During your meeting, the “Transcripts” icon will appear at the top-left corner to confirm that transcription is active. Run your meeting as usual.
Step 4: End your meeting by clicking “Leave Call.” An email with a link to the transcript (saved as a Google Doc) will be sent to the meeting organizer, co-hosts, and the person who started the transcription. The meeting organizer can also find it in their Google Drive in a folder called “Meet Recordings.”
Pros
- Easy to set up and use: Once enabled, transcription runs automatically in the background.
- Multilingual support: Supports 8 languages (English, French, German, Italian, Japanese, Korean, Portuguese, and Spanish) with good accuracy.
- AI-powered summaries: For eligible Workspace plans, Gemini AI can generate meeting summaries and suggest action items, enhancing post-meeting follow-ups.
- Integration with Google Workspace: Transcripts are automatically saved as Google Docs and linked to the corresponding Calendar event for easy access and sharing.
Cons
- Limited availability: Only available on desktop to specific Google Workspace plans.
- Accuracy issues: May struggle with heavy accents, overlapping speech, or technical jargon.
- Storage limitations: Transcripts are stored in Google Drive and count toward your storage quota.
Pro Tip: The clearer your recording, the more accurate your transcript. Riverside records in studio quality without letting your internet connection affect resolution. You get up to 99% accurate AI transcriptions with speaker labels, and you can use your transcript to edit your recording.
How to transcribe with Google Docs voice typing
Price: Free.
Best for: Dictation or single-speaker transcription.
Transcribing speech to text is easy with Google Docs’ voice typing feature. This built-in voice-to-text feature is free, and I found it to be versatile and easy to use. This option is very basic, though. There’s no speaker differentiation or even automatic punctuation. Plus, this functionality is only supported in Google Chrome, Microsoft Edge, or Safari browsers.
Here’s how to use Google Docs voice typing:
Step 1: Navigate to Google Docs and open or create a new document.
Step 2: In the menu bar, click “Tools” then “Voice typing.”

Step 3: Click the dropdown to select your language.
.webp)
Step 4: Click the “Microphone” icon to start transcribing. It will turn red to show that it’s recording. Speak clearly or play a recording into your device’s microphone. Your words will appear in real-time in the document.
Step 5: Voice typing requires commands for punctuation. You can add these by saying “period,” “comma,” “question mark,” etc. Note that punctuation commands are supported only in selected languages.
.webp)
Step 6: When you’re done, click the red “Microphone” to stop the recording and review your transcript. You can edit your transcript just like any other Google Doc.
Pros
- Free and easy to use: Simple and straightforward to use, requiring minimal setup.
- Supports more than 100 languages: Use Google’s Voice Typing to transcribe an extensive list of languages and dialects.
- Real-time transcription: Transcribes as you speak, allowing you to create an instant transcript.
- Edit with voice commands: Use voice commands like “select next paragraph” or “bold” to edit, format, and navigate your doc.
Cons
- Browser limitations: Works best on Chrome, may suffer from minor issues in other browsers.
- No speaker identification: Provides no context regarding who said what, making it better suited for transcribing a single voice.
- Limited voice commands in non-English languages: Punctuation and editing commands mostly work in English. Transcription is also less accurate in non-English languages.
How to transcribe with Google Keep
Price: Free.
Best for: Transcribing on the go.
If you need to capture a quick thought or idea on the fly, Google Keep offers a convenient voice-to-text feature to dictate notes that are instantly transcribed into text. I found it useful for taking notes on the go, but it isn’t sophisticated enough to capture a full conversation. It also times out after only a second or so of silence.
Here’s how to use Google Keep tTranscription:
Step 1: Open the Google Keep app on your Android or iOS device. Tap the “+” icon to start a new note.
Step 2: Select “Audio” and begin speaking to transcribe your text in real time.

Step 3: Your note will save automatically when you stop speaking.
It will also sync across all devices linked to your Google account, so you can access your transcript from anywhere.
Pros
- Free and mobile-friendly: Google Keep is free and works on both Android and iOS devices.
- Real-time transcription: Instantly converts speech into text as you talk.
- Audio backup: Keeps a copy of the original audio alongside the text, providing a reference for accuracy.
- Integration with Google Docs: Easily export notes to Google Docs for more extensive editing or formatting.
Cons
- Variable accuracy: Not the smartest transcriber in town. If there is any background noise, transcript quality will suffer.
- Mobile only: Voice transcription is available only on the mobile app, not on the web version of Google Keep.
- Difficult to capture longer notes: Automatically turns on when you speak and off when you stop. Any pauses in speech (even normal ones) will automatically cut off your transcript.
Read: How to Transcribe a Voice Memo to Text
How to transcribe with Google Live Transcribe
Price: Free.
Best for: Making conversations more accessible.
Google Live Transcribe is a free accessibility app developed by Google for Android devices. It uses your phone’s microphone to provide real-time speech-to-text transcription on screen. It includes features that are helpful for people who are hard of hearing, but I found its accuracy to be only so-so.
Here’s how to use Google Live Transcribe:
Step 1: Download the Live Transcribe app from the Google Play Store.
Step 2: Open the app, and grant it permission to use your microphone when prompted.
Step 3: Tap the gear icon to access settings. Here you can select a primary and secondary language, adjust text size, and opt to save transcription history for up to 3 days.

Step 4: Speak normally into your phone’s microphone. Live transcribe will instantly display the spoken words as text on the screen.

Step 5: To save the transcript, select and copy the text to paste it into another document, such as Google Docs.
Pros
- Accurate and easy: This app is dead easy to use and it accurately transcribes text with proper grammar.
- Accessibility features: Set the phone to vibrate when certain words (like your name) are spoken, or when speech resumes.
- Multi-language support: Supports more than 80 languages and dialects and allows switching between two languages mid-conversation.
- Transcribe offline: Can be used offline in some languages (like English), making it great for travel or spotty connections.
Cons
- No speaker identification: Can’t identify or differentiate between speakers.
- Limited save options: Transcriptions are only saved for a maximum of 3 days, and there’s no option to separate conversations into files.
- Limited export or syncing: To save your transcript, you need to manually cut and paste it into another file.
- Android only: Only available for Android 5.0+ devices.
How to transcribe with the Google Recorder App
Price: Free.
Best for: Interviews, meetings, note-taking.
The Google Recorder app automatically transcribes audio in real time, offers search through speech, and works completely offline. I find it very simple to use, and transcripts are quite accurate. But, it’s unfortunately limited to Google Pixel phones.
Here’s how to use the Google Recorder App:
Step 1: Open the Recorder app on your Pixel phone (it comes pre-installed).
Step 2: Tap the red button to start recording.

Step 3: Speak clearly into the phone. You’ll see your words transcribed in real time on the screen.
.webp)
Step 4: Tap the “Pause” button to pause the recording. Use “Resume” to continue, or “Stop” to stop and save your transcript.
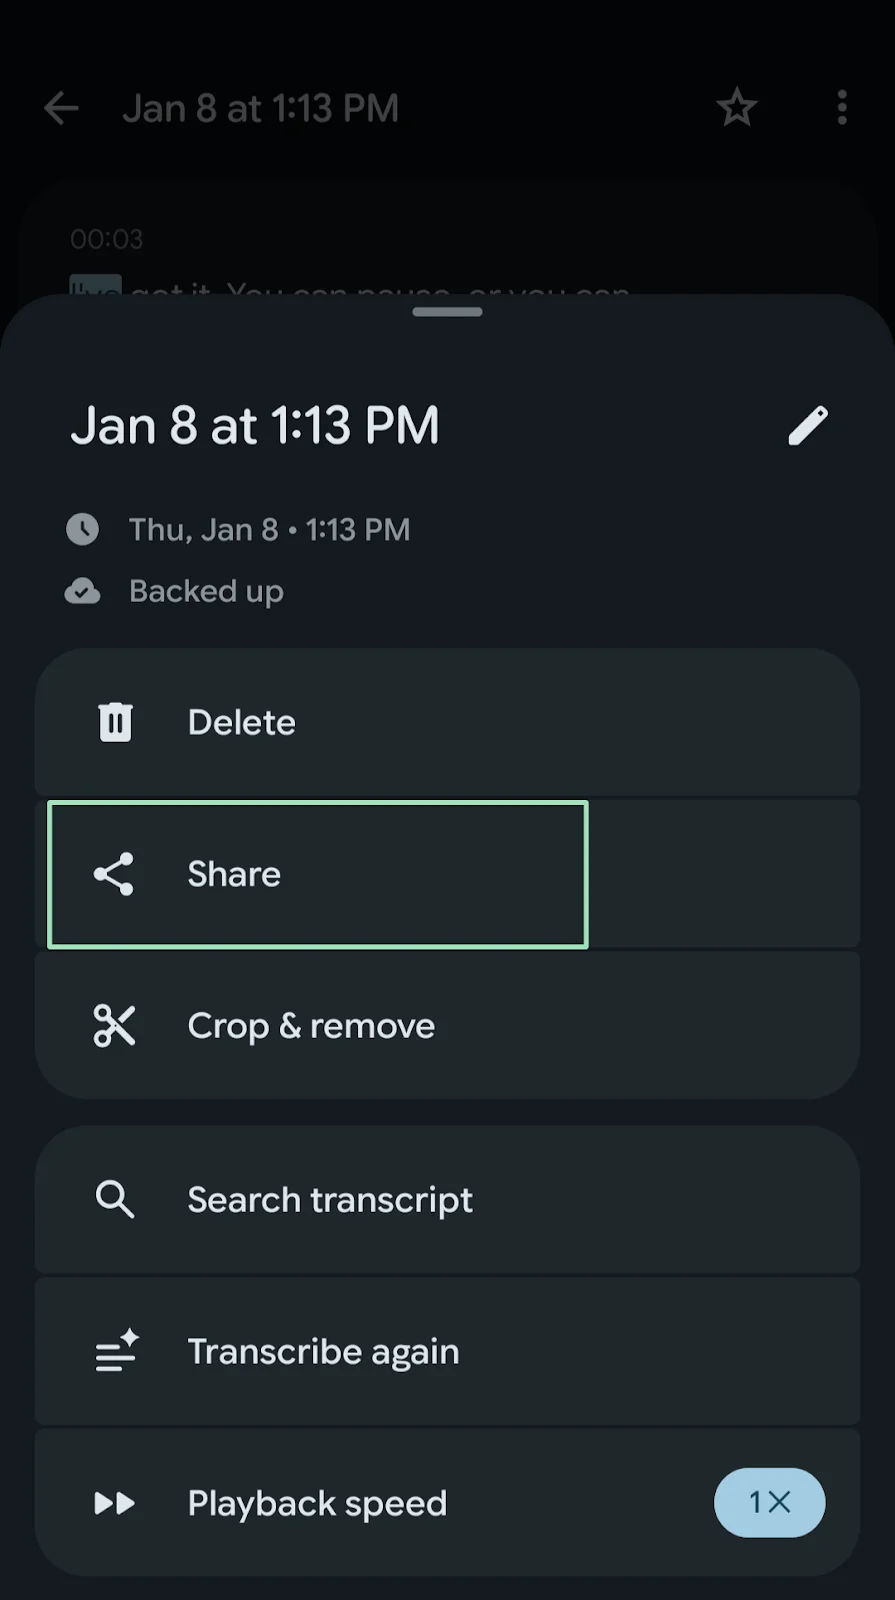
Step 5: Tap on the 3 dots in the top-right corner of your screen to access tools. Here, you can search your transcript, crop it using text-based editing, or adjust playback speed.
.webp)
Step 6. If you want to share the transcript, tap the “Share” icon. You can share the full audio (.m4a) or the text transcript. Here you can also opt to share the transcript to Google Docs.
Pros
- Accurate transcription: Pixel’s built-in noise reduction ensures a high-quality recording and accurate transcript.
- Search function: Instantly find words or phrases in the transcript.
- Edit transcripts and audio: Edit transcripts and trim audio directly from the app.
- Offline functionality: Works without internet, so you can record and transcribe from anywhere.
Cons
- Pixel phone only: Available exclusively on Pixel phones.
- Limited language support: Currently supports English only.
- No multi-speaker labeling: Doesn’t identify or separate speakers.
No direct integration with meeting platforms: You can’t record Zoom or Meet calls natively through the app (though you can record speaker output using your phone.)
Pro tip: Want the same features (and more) on any device? With Riverside’s audio transcriber you can record in high-quality from anywhere, get AI-powered transcripts with up to 99% accuracy, and edit fast.
How to transcribe with Google Speech-to-Text API
Price: Free for up to 60 minutes of transcription per month.
Best for: Transcribing recordings (no live support).
Google Cloud Speech-to-Text API is Google’s developer-focused service for speech-to-text transcription. It is one of the most powerful and scalable options out there for both real-time and pre-recorded audio transcription.
However, it’s quite technical and you need to be comfortable with a bit of setup to make it work. Overall, I didn’t find it to be worth the effort compared to other options out there.
Here’s how to use the Google Cloud Speech-to-Text API:
Step 1: Go to Google Cloud Console. Click “Select a Project” then “New project.” Name your project a name, then click “Create.”
Step 2: Use the search bar to search for and go to "Google Speech-to-TextAPI".
Step 3: Click “Create Transcription.”

Step 4: Follow the instructions to create a Google Cloud Workspace. You might need to set up billing for usage beyond the free tier.

Step 5: Select whether to save your file locally (on your computer) or in the cloud, then upload your audio file from your computer. Wait for your file to upload, then click “Continue.”

Step 6: Once your transcription is complete, you’ll find it under “Transcriptions” in the left-hand menu. Click on the file name to see and download your transcript.

Pros
- High accuracy: Google’s AI supports 125+ languages and is very accurate if the audio is clean and in high quality.
- Flexible file support: Works with pre-recorded audio in WAV, FLAC, MP3 and more.
- Customizable for developers: You can add features like keyword boosting, timestamping, or real-time transcription. Easily integrated into larger automation workflows or apps.
Cons
- Technical setup: You need to create a Google Cloud project, enable billing, and manage service account keys.
- No built-in UI: There’s no dashboard or transcript viewer unless you build one or export the results manually.
- Takes time: An hour-long transcript takes several minutes to transcribe.
- Not completely free: After your 60 free minutes are up, you need to pay $0.006 per 15 seconds of translation.
Bonus: How to transcribe with Riverside
Price: Free transcription tool or paid plans starting from $24/month.
Best for: Repurposing your transcripts into endless assets.
Riverside is a great alternative if you want a transcription tool you can actually use to create content.
While Google’s tools are great for quick notes, they struggle with multiple speakers or lower audio quality. Riverside records high-quality audio locally regardless of internet connection, so alI transcriptions are up to 99% accurate. Plus, every speaker will be labeled separately so you can identify them at a glance.
But it doesn’t end here. You can use the transcript to cut and trim your video like you’re editing a word document thanks to text-based editing. Then use Co-creator, Riverside’s AI assistant to highlight the best moments of your recording, pull quotes, and even turn that transcript into blog posts or newsletters just by chatting. You can even translate and dub your video into up to 30 languages.
The best part? You can do everything with a single tool!
Here’s how to use Riverside to transcribe your audio and video:
Step 1: Log in to your Riverside account. From your dashboard, choose whether you want to record new content or upload an existing audio or video file.

Once the recording ends, Riverside automatically generates a transcript with perfect speaker differentiation.
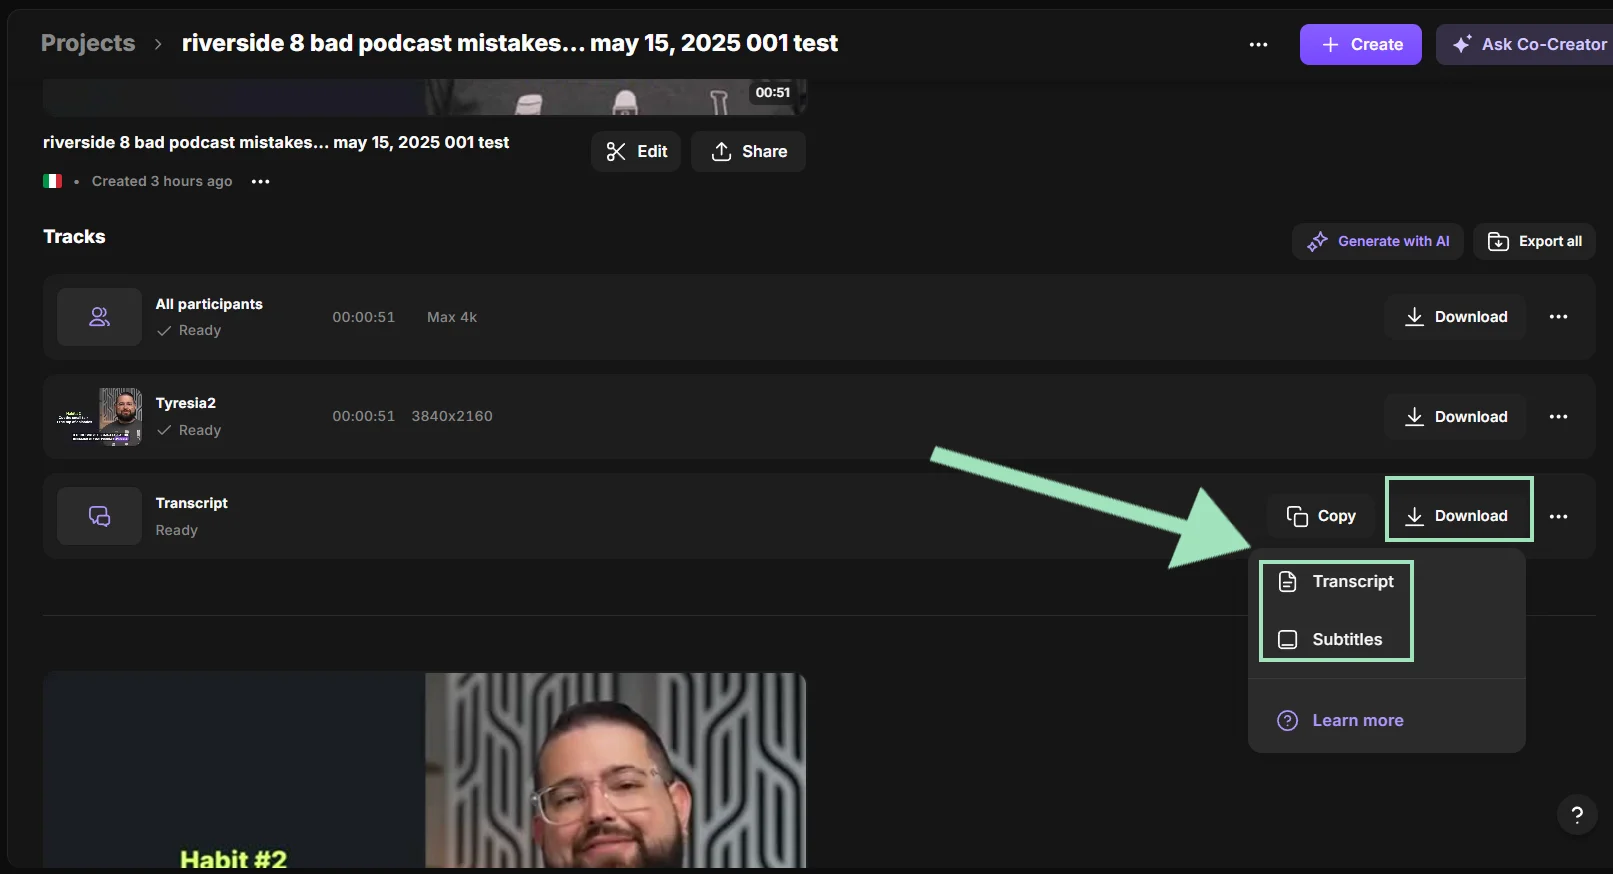
Step 2: From your projects page, select your newly recorded content. Select the “Recordings” tab and scroll down until you find the transcript. You can download it as a plain text file (TXT) or timestamped subtitles (SRT).
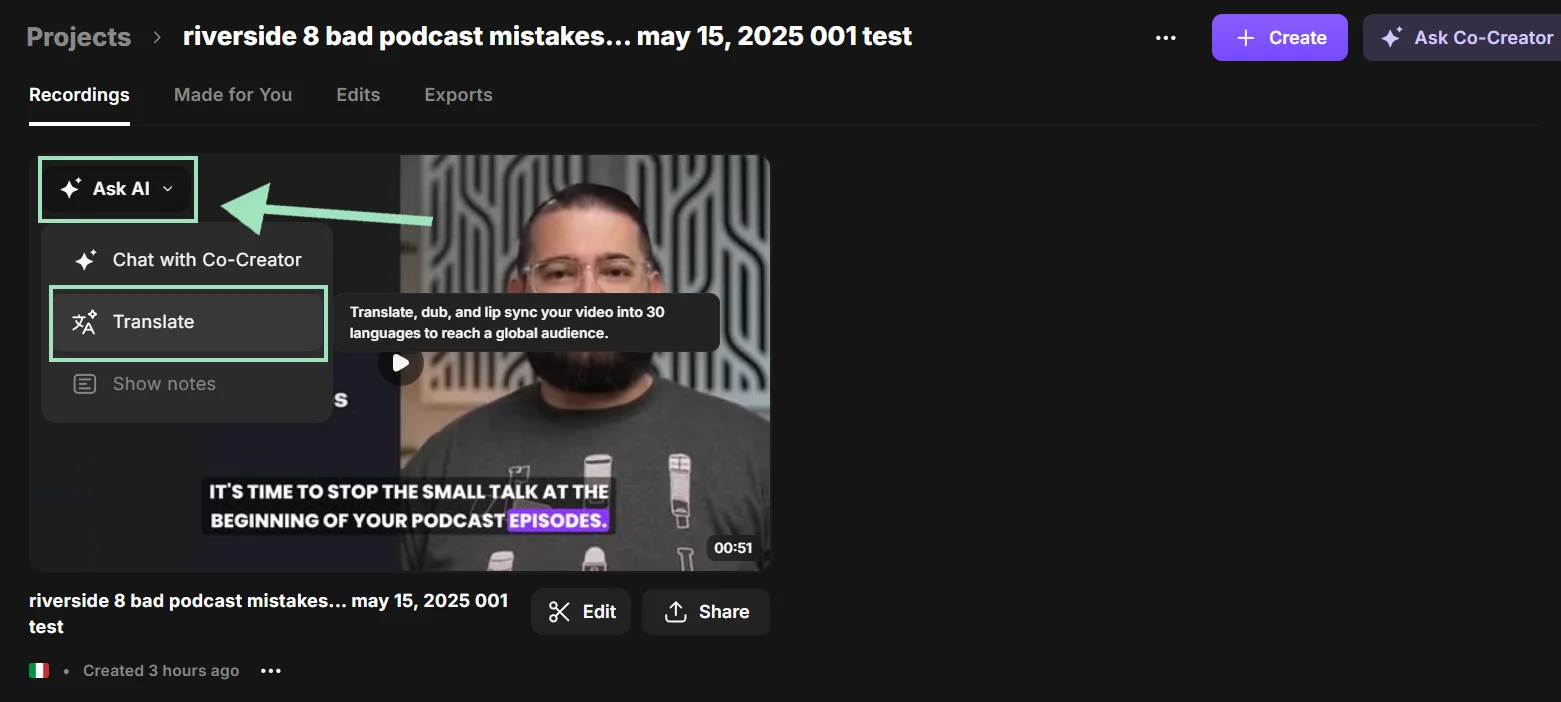
Step 3: If you want to translate and re-dub your recording in more than 30 languages, hover on the video and click on “Ask AI”.
From the drop-down menu, select “Translate” then pick the language and dialect you want to translate it to.
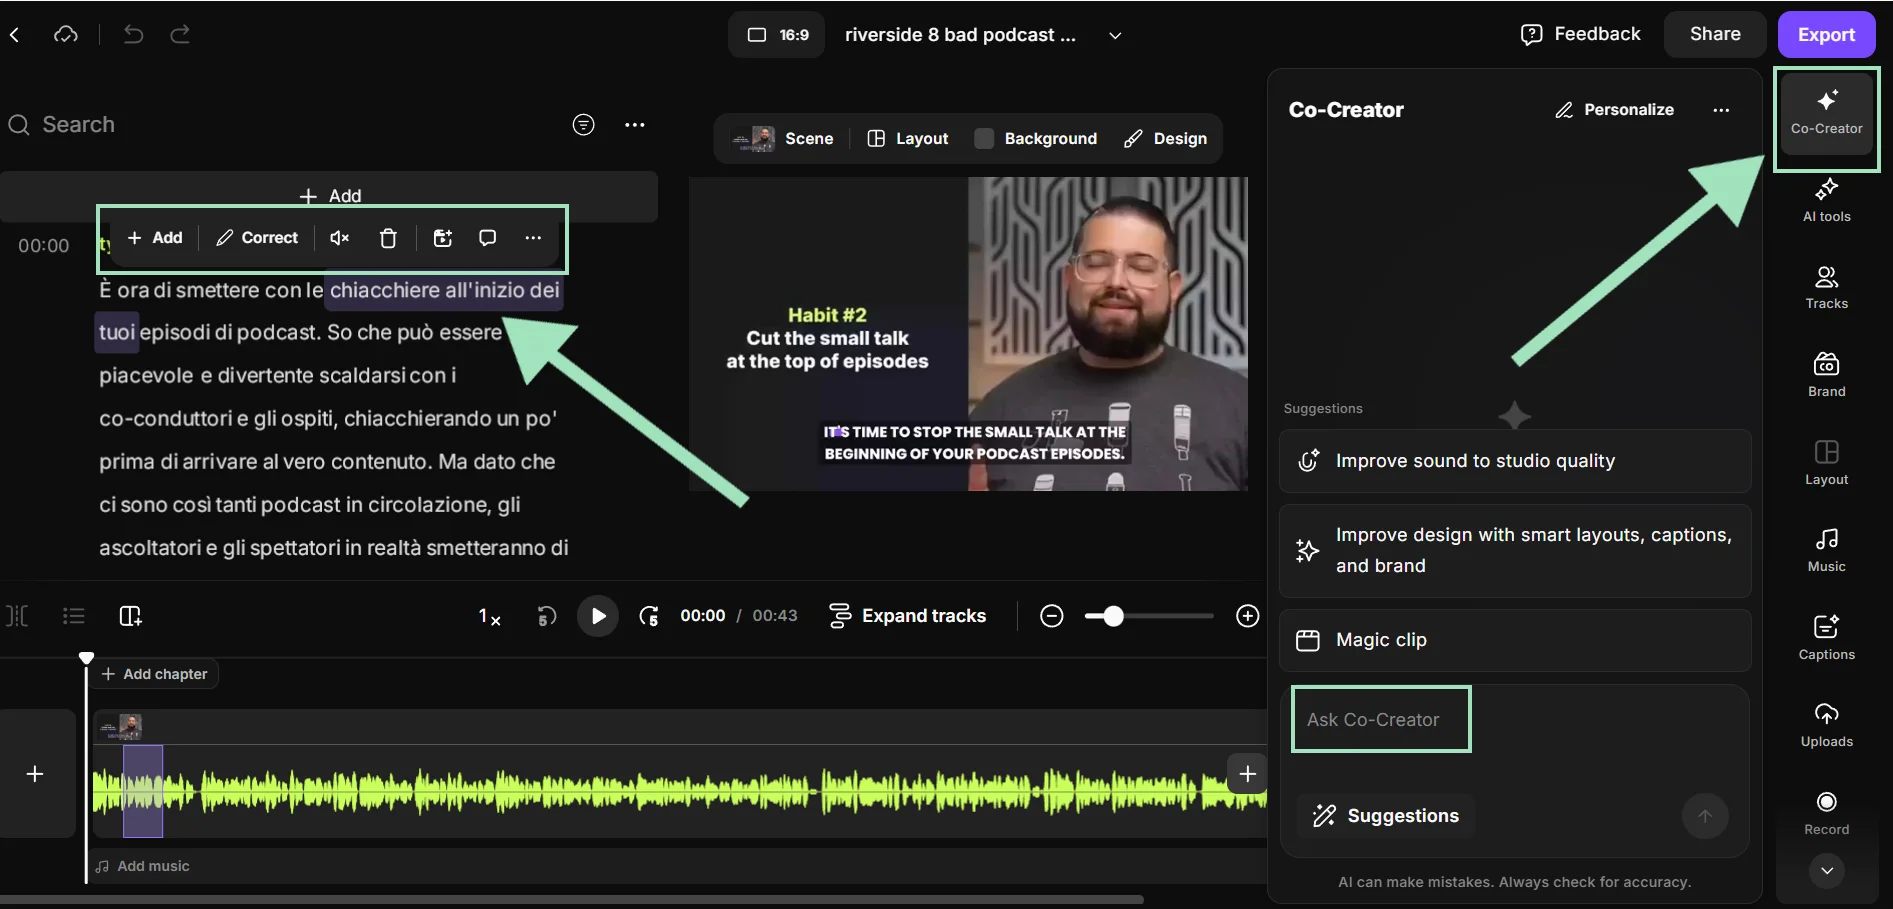
Step 4: If you want to edit your recording with our text-based editor, select the “Edits” tab, then click on “Edit” below the video to access the editor.
From here, you can cut and trim your recording by simply deleting words in the transcript.
You can also click on the “Co-creator” tab on the upper right corner to repurpose your content by chatting with Co-creator.
Pros
- High accuracy: Uncompressed, local recording makes transcriptions more accurate (up to 99%) than cloud-based tools.
- Speaker detection: Automatically identifies and labels different speakers, saving the effort of manual formatting.
- Multi-language support: More than 100 languages supported plus AI Video Dubbing to translate your actual voice.
- Text-based editing: You can edit your video and audio recording by simply deleting words in the transcript.
- Instant repurposing: Co-Creator can turn your transcript into blogs, thumbnails, social posts, newsletters, and more, just by chatting.
Cons
- Paid plan required: More advanced AI features like Co-Creator and AI translation require a paid plan and AI credits.
- Overkill for quick notes: It’s a professional studio tool, so it might be more than you need for a quick grocery list or voice memo.
FAQs about Google transcription
Is Google transcription free?
Yes, most Google transcription tools are free to use, but their functionality is limited. For example, Google Docs voice typing and Google Keep don’t go beyond single-speaker dictation or quick notes.
Fortunately, there are lots of free transcription tools out there. If you’re looking for transcriptions built into your workflow, try Riverside. You’ll get:
- Automatic transcriptions straight after recording with 99% accuracy.
- Text transcriptions and SRT subtitle transcripts with speaker identification.
- A chat-based editor that you can use to turn your transcription into a newsletter, blog and other assets.
- High-quality recordings for cleaner transcriptions.
- A full-suite text-based editor where you can use your transcript to edit your video. Any text you delete syncs with your actual recording.
And more!
How do you convert a Google Doc to audio?
Converting a Google Doc to audio has become much easier with the integration of Gemini directly into Google Workspace.
If you have a Google Workspace account, there is now a native audio player inside Docs.
Go to “Tools,” then “Audio,” and select “Listen to this tab.”
Google doesn’t allow you to save this audio directly. But, you could use the Speechify Chrome extension to both listen to and download the audio version of a Google Doc.
If you don’t have Google Workspace, you can use the Text to Speech Google Docs extension to convert your text to audio for listening.
Does Google Docs have a transcription feature?
Yes, it does. It’s called “voice typing,” but it’s designed primarily for dictation rather than true transcription.
To activate this feature, open a Google Doc and click “Tools” then select “Voice typing.” Click the microphone and start speaking and Docs will transcribe your speech.
Note that voice typing does not add punctuation, but you can dictate this and other formatting as part of your speech.
Can Google translate audio to text?
Google Cloud’s Speech-to-Text API can be combined with the Translate API to transcribe audio and then translate it. However, this solution does require technical knowledge and developer-level setup to implement. For a simpler solution, you can try Google Gemini. It transcribes audio files quite well and can translate them into 100+ languages.
Is Google Live Transcribe free?
Google Live Transcribe is 100% free, but it’s only available for Android devices. It comes pre-installed on some Android phones and can be downloaded from the Google Play Store. While there are several other apps that go by very similar names in the Apple App Store, most of these third-party apps charge a subscription fee.


.webp)
.webp)


.webp)

